I’ve said it before, and I’ll say it again – Attachments is a great WordPress plugin. In this post I am going to put it to good use and go through how you can use it to create a gallery page that utilises lightbox functionality and thumbnails in your latest web design. Image examples of this page can be seen below.


So, let’s begin:
Step One – Install plugins
First of all you will need to install the attachments plugin, as well as a lightbox plugin.
- Navigate to http://www.you-site.com/wp-admin
- Log in and click the Plugins tab
- Click add new and search for “Attachments“
- It should be the first result, but if not, it was created by Jonathan Christopher
- Click Install now, and then Activate Plugin
The attachments plugin is now installed. I will explain how to use it and where to find it shortly.
The next step is to install a lightbox plugin, alternatively, you can manually set up a lightbox script. For ease of explanation, I will install the Lightbox 2 plugin.
Follow the instructions above but install Lightbox 2 by Lokesh Dhakar. This plugin has its own settings, but for now we will just use the default settings.
Go forth, to step 2!
Step Two – Create Your Gallery Page
Now we need a page. In order to do this you will need to follow these steps:
- Navigate to http://www.you-site.com/wp-admin
- Click Pages, and then Add New
- All you need to do is give your page a title and publish it. We will call this page Gallery
By calling our page Gallery, a slug of “gallery” is created. This means we can create a custom template in our theme folder (I’m using TwentyTen), called page-gallery.php. Our gallery page will default to use this page template, over the standard page.php in our theme folder.
To create the page-gallery.php page, do the following:
- Open your theme folder via FTP.
- Duplicate page.php and rename it page-gallery.php
- Done!
So, we’ve installed our plugins, created a WordPress page and given said page its own custom template. We’re doing very well, very well indeed!
Step Three – Add our Image Sizes
You will now need to add two image sizes. To do this, follow these steps:
- Open functions.php from your theme folder
- Scroll to the bottom, and before the closing php tag (?>) (or just at the end of the document if there isn’t one) add the following lines:
add_image_size('gallery-thumb', 100, 100, true); add_image_size('gallery-full', 800, 9999); - This will add two new thumbnail sizes. The first is a cropped 100px x 100px square. The second is 800px wide and 9999px tall; this means it will just have a max-width of 800px, but no real height value.
- Save your functions.php file and upload it.
Step Four – Add some Images to Our Gallery Page
Now, the fun part (one of the fun parts, anyway). Navigate to your Gallery Page in the WordPress admin area. Once you have it open, you will notice there is a new “postbox”, called Attachments.

There is only button available, click it! You will be greeted with a familiar sight – but don’t be fooled, it is slightly different.
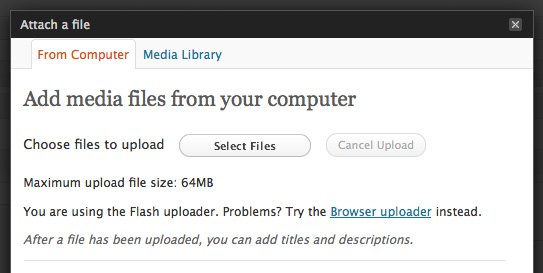
Click Select Files and choose the images you want to upload. You can select more than one at a time. Click Open and wait for the images to upload and “crunch”.
Once the images are uploaded, you will be able to click Show or Hide. After clicking Show, you will see the following options:
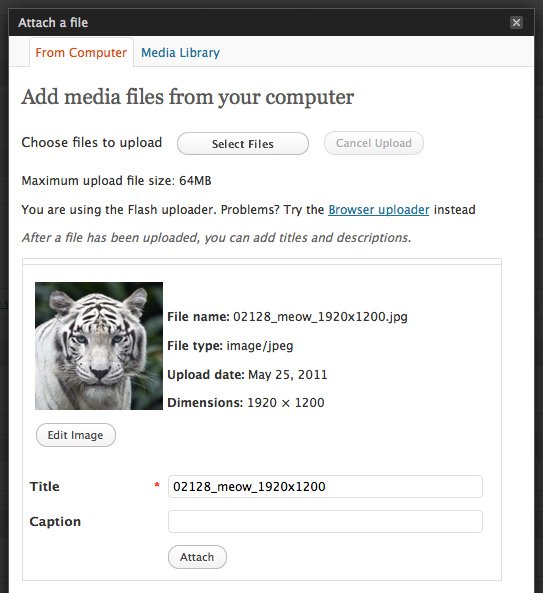
As you can see, there are two fields – Title and Caption. Both of these can be used an brought out in our gallery, but for this particular tutorial I will only be using the title field. Enter a title for your image; this will be shown in the lightbox once you click on the thumbnail in the gallery.
Once you have entered a title, click Attach. There aren’t any confirmations that it has attached, but it will have happened in the background. Once you have attached all the images you want, you can just click the “x”, top right.
Your Attachments postbox should now be filled with the images you have just uploaded and attached.
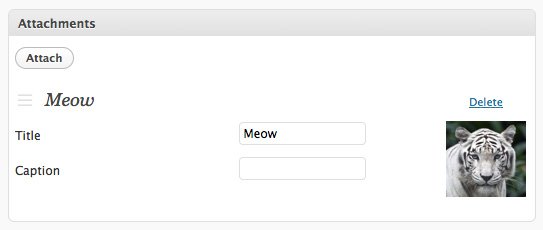
I am assuming you have more than one image in your gallery. You will notice that next to each attachment (on the left), there are three grey lines – using these you can click, hold and drag, to re-order your gallery items.
Step Five – Create the loop
Now that we have our images in place, we will need to loop through them and spit them out in our page-gallery.php template.
Open page-gallery.php. As it is a custom template I find it better to have the loop in the template, rather than using get_template_part. So if needed, replace:
<?php
/* Run the loop to output the page.
 * If you want to overload this in a child theme then include a file
 * called loop-page.php and that will be used instead.
 */
get_template_part( 'loop', 'page' );
?>
With:
<?php if ( have_posts() ) while ( have_posts() ) : the_post(); ?>

        <div id="post-<?php the_ID(); ?>" <?php post_class(); ?>>
                <?php if ( is_front_page() ) { ?>
                        <h2 class="entry-title"><?php the_title(); ?></h2>
                <?php } else { ?>
                        <h1 class="entry-title"><?php the_title(); ?></h1>
                <?php } ?>

                <div class="entry-content">
                        <?php the_content(); ?>
                        <?php wp_link_pages( array( 'before' => '<div class="page-link">' . __( 'Pages:', 'twentyten' ), 'after' => '</div>' ) ); ?>
                        <?php edit_post_link( __( 'Edit', 'twentyten' ), '<span class="edit-link">', '</span>' ); ?>
                </div><!-- .entry-content -->
        </div><!-- #post-## -->

        <?php comments_template( '', true ); ?>

<?php endwhile; // end of the loop. ?>
Now we will need to add our attachments loop. Just above:
<?php comments_template( '', true ); ?>
add the following code:
<ul id="gallery">
    <?php
      $attachments = attachments_get_attachments();
      $total_attachments = count($attachments);
      if( $total_attachments > 0 )
      {
        for ($i=0; $i < $total_attachments; $i++)
        {
          $url =  wp_get_attachment_image( $attachments[$i]['id'], 'gallery-thumb');
          $lrgurl = wp_get_attachment_image_src( $attachments[$i]['id'], 'gallery-full' );
          echo '<li><a href="'.$lrgurl[0].'" rel="lightbox[our-gallery]" title="'.$attachments[$i]['title'].'">' . $url . '</a></li>';
        }
      }
    ?>
</ul>
So now your page-gallery.php loop area will look like this:
<?php if ( have_posts() ) while ( have_posts() ) : the_post(); ?>

        <div id="post-<?php the_ID(); ?>" <?php post_class(); ?>>
                <?php if ( is_front_page() ) { ?>
                        <h2 class="entry-title"><?php the_title(); ?></h2>
                <?php } else { ?>
                        <h1 class="entry-title"><?php the_title(); ?></h1>
                <?php } ?>

                <div class="entry-content">
                        <?php the_content(); ?>
                        <?php wp_link_pages( array( 'before' => '<div class="page-link">' . __( 'Pages:', 'twentyten' ), 'after' => '</div>' ) ); ?>
                        <?php edit_post_link( __( 'Edit', 'twentyten' ), '<span class="edit-link">', '</span>' ); ?>
                </div><!-- .entry-content -->
        </div><!-- #post-## -->

        <ul id="gallery">
                <?php
                  $attachments = attachments_get_attachments();
                  $total_attachments = count($attachments);
                  if( $total_attachments > 0 )
                  {
                        for ($i=0; $i < $total_attachments; $i++)
                        {
                          $url =  wp_get_attachment_image( $attachments[$i]['id'], 'gallery-thumb');
                          $lrgurl = wp_get_attachment_image_src( $attachments[$i]['id'], 'gallery-full' );
                          echo '<li><a href="'.$lrgurl[0].'" rel="lightbox[our-gallery]" title="'.$attachments[$i]['title'].'">' . $url . '</a></li>';
                        }
                  }
                ?>
        </ul>

        <?php comments_template( '', true ); ?>

<?php endwhile; ?>
The above code will loop through all the attachments on your Gallery page, and spit all the thumbnails out in list items. Each thumbnail is clickable and has a rel attribut of lightbox[our-gallery]. This rel attribute defines a set of images. Upload the file and use your web browser to navigate to http://www.your-domain.com/gallery, you should see a list of the image thumbnails that you added earlier. To quickly style it up, add the following CSS to your style.css file in your theme folder:
#gallery {
    margin:0 -10px;
    padding:0;
    overflow:hidden;
    width:360px;
}

#gallery li {
    width:100px;
    float:left;
    display:inline;
    height:100px;
    margin:8px;
    padding:0;
    -moz-box-shadow: 0 0 5px #888888; /* Firefox */
    -webkit-box-shadow: 0 0 5px #888888; /* Safari, Chrome */
    box-shadow: 0 0 5px #888888; /* CSS3 */
    border: 2px solid #FFFFFF;
}
That’s it! When you click one of the thumbnails now, it should open in a lightbox which you can then use to navigate through the rest of your images. You can also go into the lightbox settings and change the theme of the lightbox.
Conclusion
So, you’ve created your own gallery! The great thing about this is that you can completely customise this gallery, specific to your website. The attachments plugin comes with a variety of data that you can bring back, take a look at the available tags in this loop:
<?php
  if( function_exists( 'attachments_get_attachments' ) )
  {
    $attachments = attachments_get_attachments();
    $total_attachments = count( $attachments );
    if( $total_attachments ) : ?>
      <ul>
      <?php for( $i=0; $i<$total_attachments; $i++ ) : ?>
        <li><?php echo $attachments[$i]['title']; ?></li>
        <li><?php echo $attachments[$i]['caption']; ?></li>
        <li><?php echo $attachments[$i]['id']; ?></li>
        <li><?php echo $attachments[$i]['location']; ?></li>
        <li><?php echo $attachments[$i]['mime']; ?></li>
      <?php endfor; ?>
      </ul>
    <?php endif; ?>
<?php } ?>
As you can see, you can bring out the title, caption, image ID, image location, and the mime type. There is a lot you can do with all that data!
Anyway, I hope you enjoyed it – let me know how you get on, and link me to some galleries that you’ve made using this tutorial.


07:17 27/05/2011
Hi James! BEAUTIFUL! I like wordpress very much and its plugins, and everything it provides for professional/amateur. No w I urgently need FRESH ideas how to publish psd to wordpress? Any software to automated conversion, since I am useless in CSS/HTML coding))
07:43 27/05/2011
There aren’t really any automated services to convert PSDs to WordPress themes – if it was that easy we’d all do it! Your best bet is to outsource that side of you work to a design company, like ourselves, who know the system well and can get the most out of it for you.
23:01 09/06/2011
Nice tutorial! Very understandable.
But I’ve got a question. Can you also use Fancybox (fancybox.net) instead of Lightbox with this tutorial?
07:59 10/06/2011
Hi Jerry, you can use any lightbox you want! Fancybox is a very nice alternative, I also enjoy using colorbox. Glad you liked it.
10:36 27/06/2011
Hi James, thanks – this is exactly what I’m looking for! Just a quick question: would it be possible to use this code to embed more than one gallery on a single page. Ie. have multiple gallery pages and publish them all on the same page-gallery.php template?
Thanks!
10:42 27/06/2011
Hi James,
Definitely possible, yes. There are a couple of methods you could use:
1. Create a custom post type of “Galleries”. Each post in that post type would be a gallery, and each gallery would have it’s own attachments. You could then loop through all posts in the galleries post type and do what you want with the data. The lightboxes are grouped together by the rel attribute, so each gallery would just have to have the same rel
2. Your second option is to use the caption or title attribute of each attachment to group them together. For example, all attachments with a caption of “gallery1″ would belong to one gallery, “gallery2″ to another, etc. You would then do an if statement in the code to filter through them.
Personally I’d go with option 1!